

Qualtrics XM is a user-friendly survey tool that facilitates the process of creating, distributing, and analyzing surveys. The program offers a range of question formatting and distribution options.
Please note that it may take between 7-10 business days for new accounts to be created.
QUICK LINKS
| Create an Account | Data & Reports |
| Change Password | Training Link |
| Getting Started | Support |
| Distribution | Moving User Account and Surveys |
Questions? Please email them to psychology.qualtrics@csuohio.edu
CREATE AN ACCOUNT
Please complete an account request form. Once we receive the request, we will begin setting up your new account* and provide you with additional directions.
*Please know that free accounts cannot be upgraded to license accounts, but your surveys can be moved by Qualtrics support.
CHANGE PASSWORD
- Click on the person icon at the top right corner of the screen
- Select “Account Settings”
- On the User Setting screen, you will see a Change Password section, type in your old and new password
- Select “Change Password”
GETTING STARTED
Creating a survey
- Go to the “Project” tab at the top right corner of the screen
- Click on the “Create Project” button at the top right corner
- Under Create Your Own, click on the “Survey” button
- Here you can name your new project, search through the library of surveys, or upload a previously made survey.
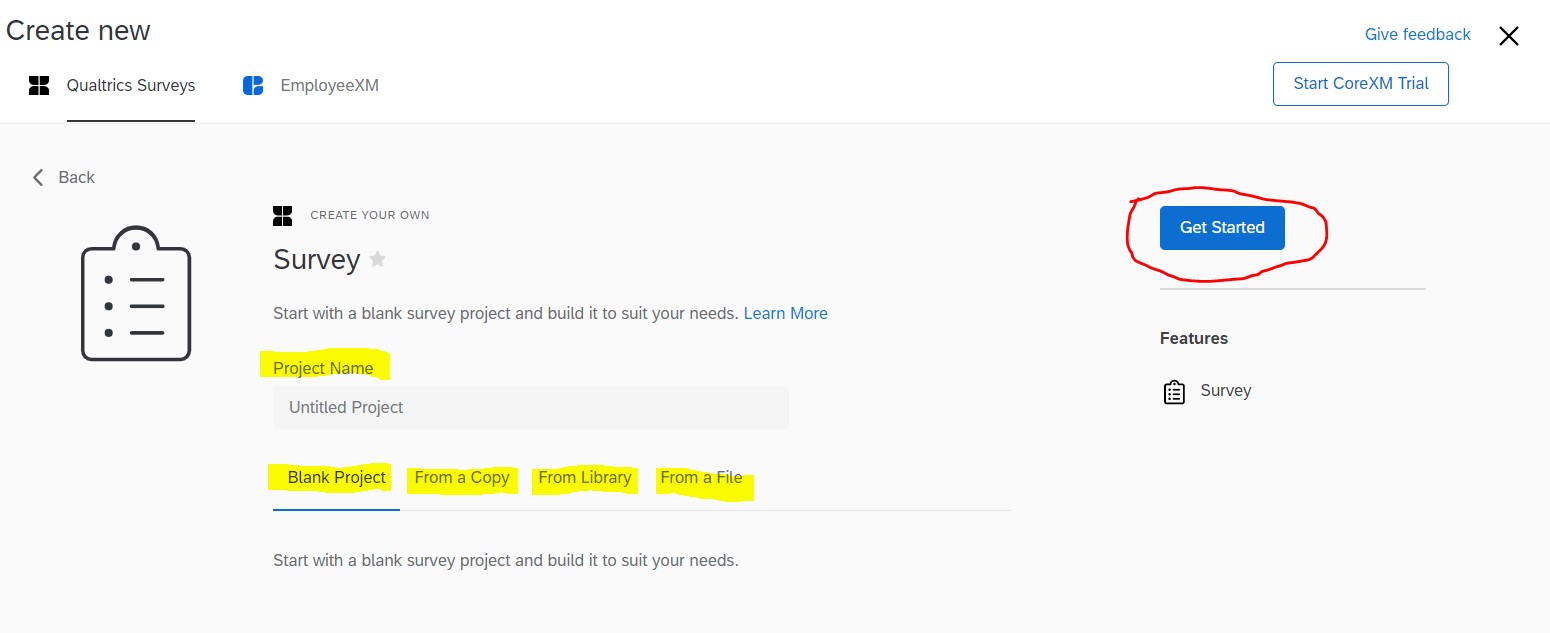
- Finally, select “Get Started”
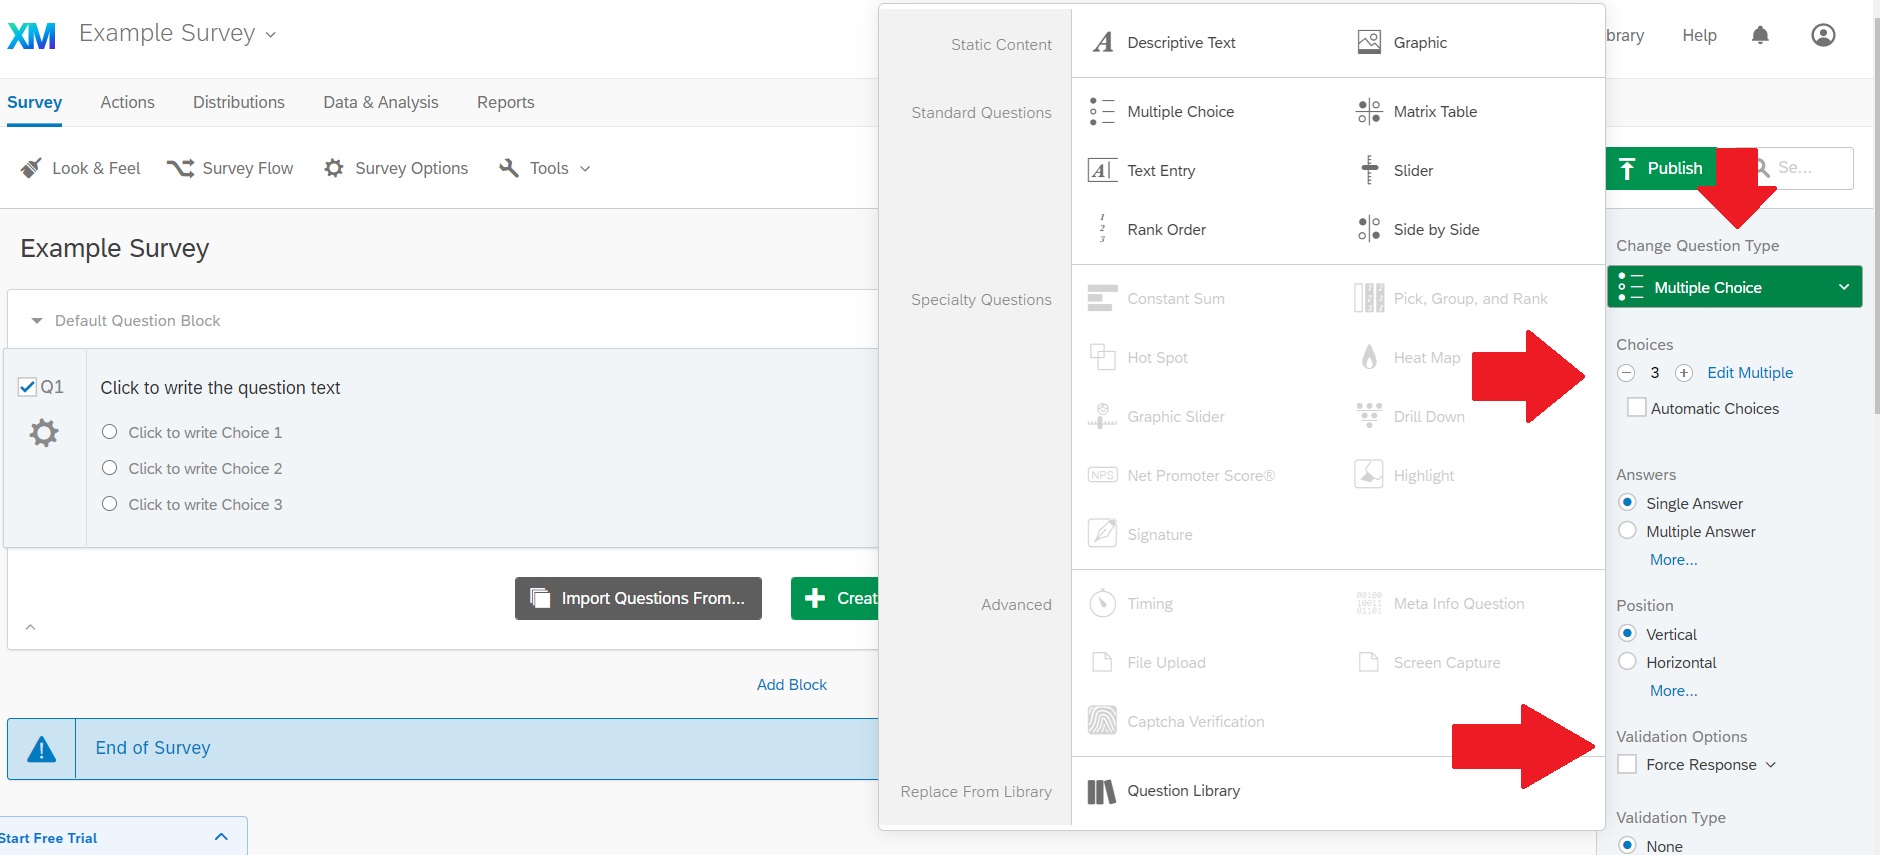
Survey Questions
- Add survey questions and blocks by clicking on the “Create Question” and “Add Block” button
- Type survey questions and choices directly into the indicated boxes
- In the right navigation, there are multiple question options: question types, number of choices, answer formatting, layout, force responses
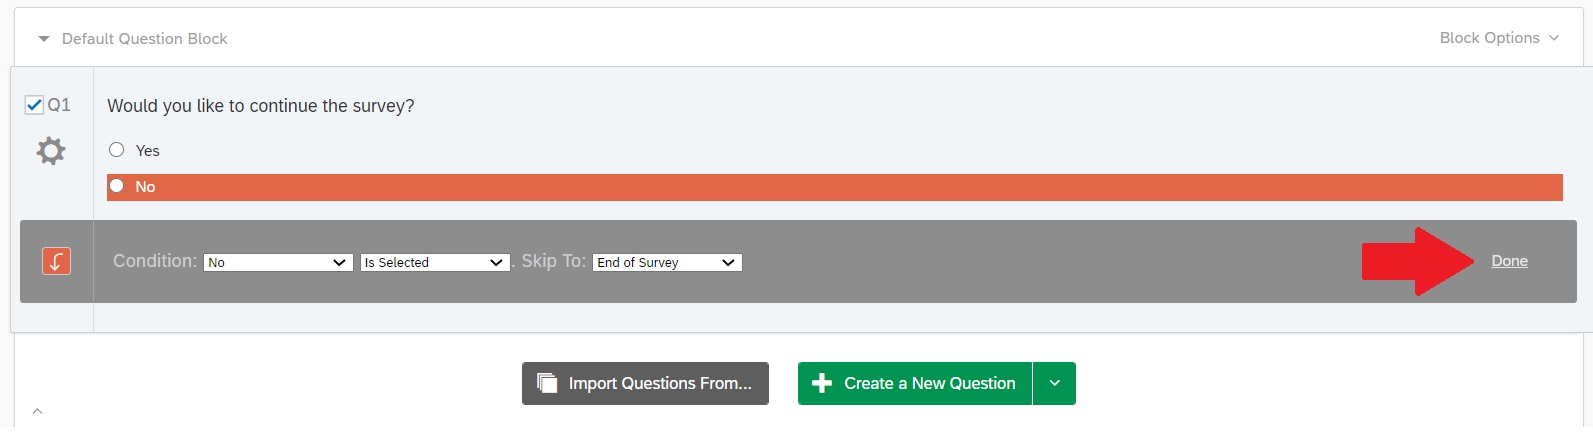
Adding Skip Logic or End the Survey
- Select the gear next to the question
- Click on “Add Skip Logic”
- Select the condition and action (skip to the end of the survey or skip to the next block), and once complete select “Done”
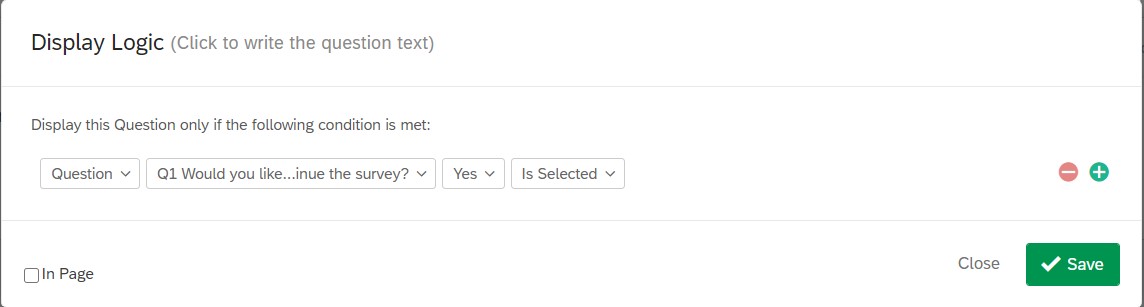
Adding Display Logic
If you would like a question to appear based on a previous answer, you can utilize the display logic function.
- Select the gear next to the new question
- Click on “Add Display Logic”
- Select the previous question and answer that should be selected in order to display the new question
Creating Randomized Conditions
In order to create a randomized condition, the builder needs to create the condition blocks before following the survey flow steps.
- Go to the Survey Flow tab
- Select “Add Below” on the block that will appear before the condition block
- Select “Randomizer”
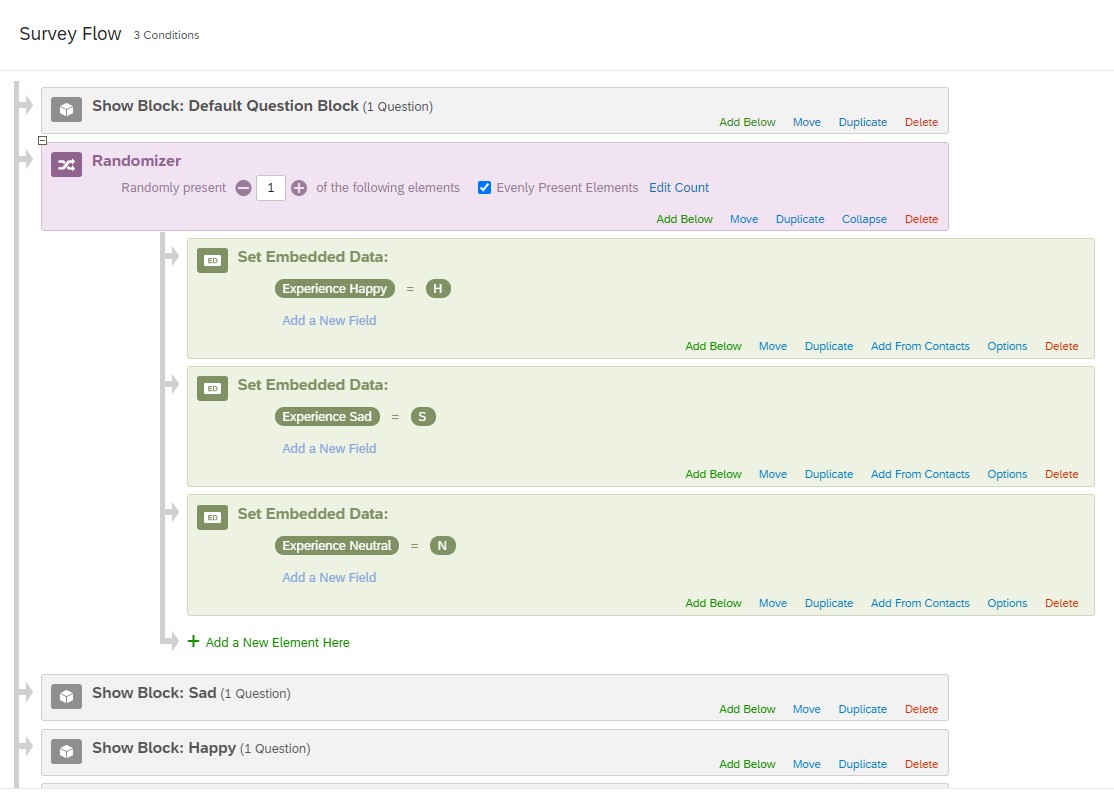
- Under the Randomizer branch select “Add a New Element Here” and then select “Embedded Data”
- Click on the drop-down menu and select “Existing Embedded Data” and choose the condition.
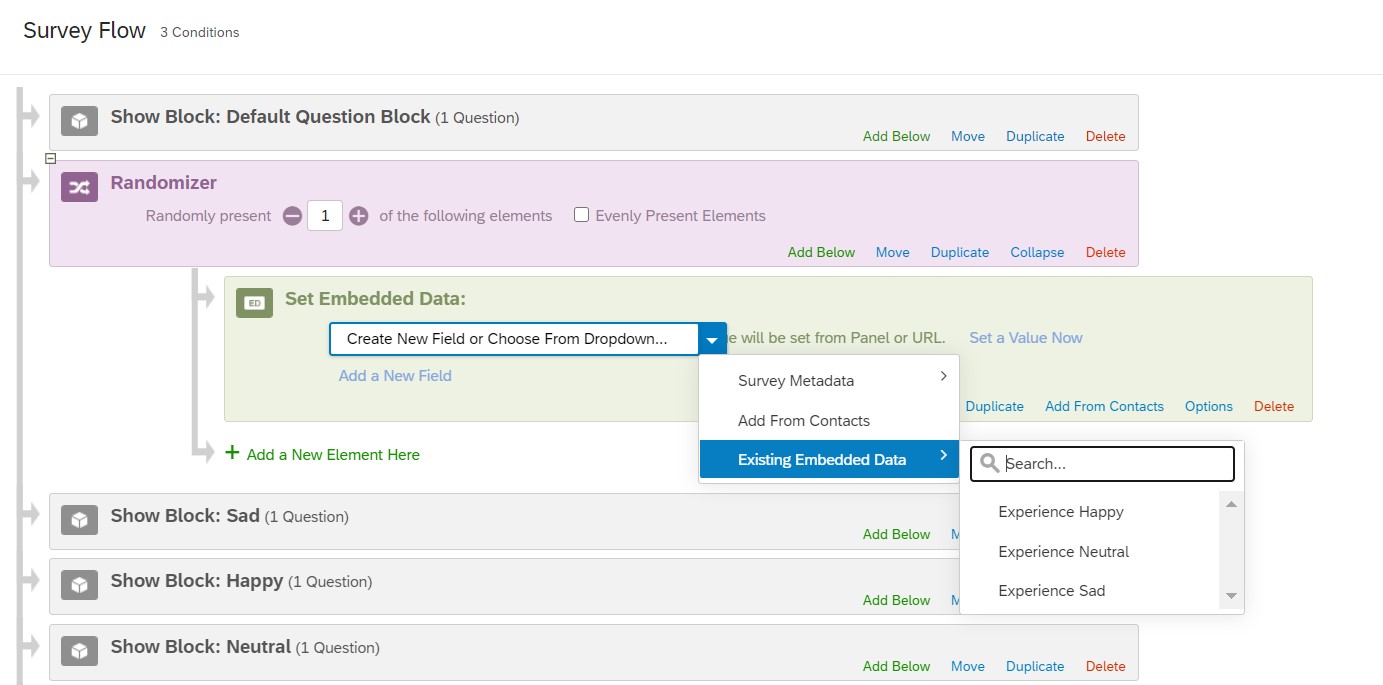
- The block name will appear, now the builder can create a custom value for the block by clicking “Set a Value Now”
- Repeat the steps all conditions
- In the purple randomizer branch, type in the number of conditions you want displayed to participants and select “Evenly Present Elements”
- Go to the grey condition branch and select “Add Below”
- Select “Add Branch” and move the blue branch above the grey condition
- Move one of the conditions below the blue branch where it says “Add Element”
- In the blue branch, select add condition
- In the first drop-down bar select embedded data. Type in name of the condition as it appears in the Set Embedded Data branch and enter the value
- Move the corresponding block under the blue branch
- Repeat for all condition group
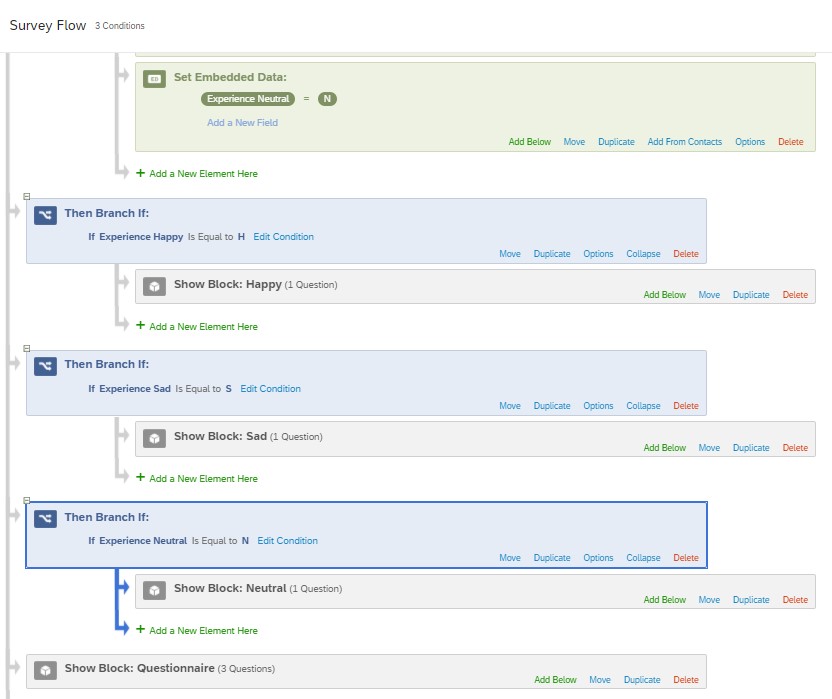
- Finally, save flow
Preview
There is a blue preview button that allows the builder to view the survey as the participant. The preview includes a computer view and a mobile phone view to ensure questions and pictures are displayed appropriately on both devices.
*Please keep in mind that the responses provided in preview mode will appear in the data results. This data can be deleted in the “Data & Analysis” tab by clicking the “Tools” drop-down menu, “Delete Data,” and then selecting “Survey Previews.”
Publish
Survey Options
Options Include: adding a back button, allowing participants to save and continue survey, open access or invite-only access, password protection, preventing multiple responses from one participant, survey expiration, customizing survey message, and establishing partial completion rules.
Embedded Data
Embedded data is additional information that is collected in addition to the survey question responses such as demographics and assigned condition.
This data can come from information included in the contact list, information related to the survey link, and values set in the Survey Flow.
Quotas
- In the “Survey” tab, you will have a “Tools” header
- Click on the “Tools” header and select “Quotas”
- Select “Add a Quota” and then name the quota category
- Here you can set the count for the quota, select the condition, use embedded data, and customize the action once the quota is met
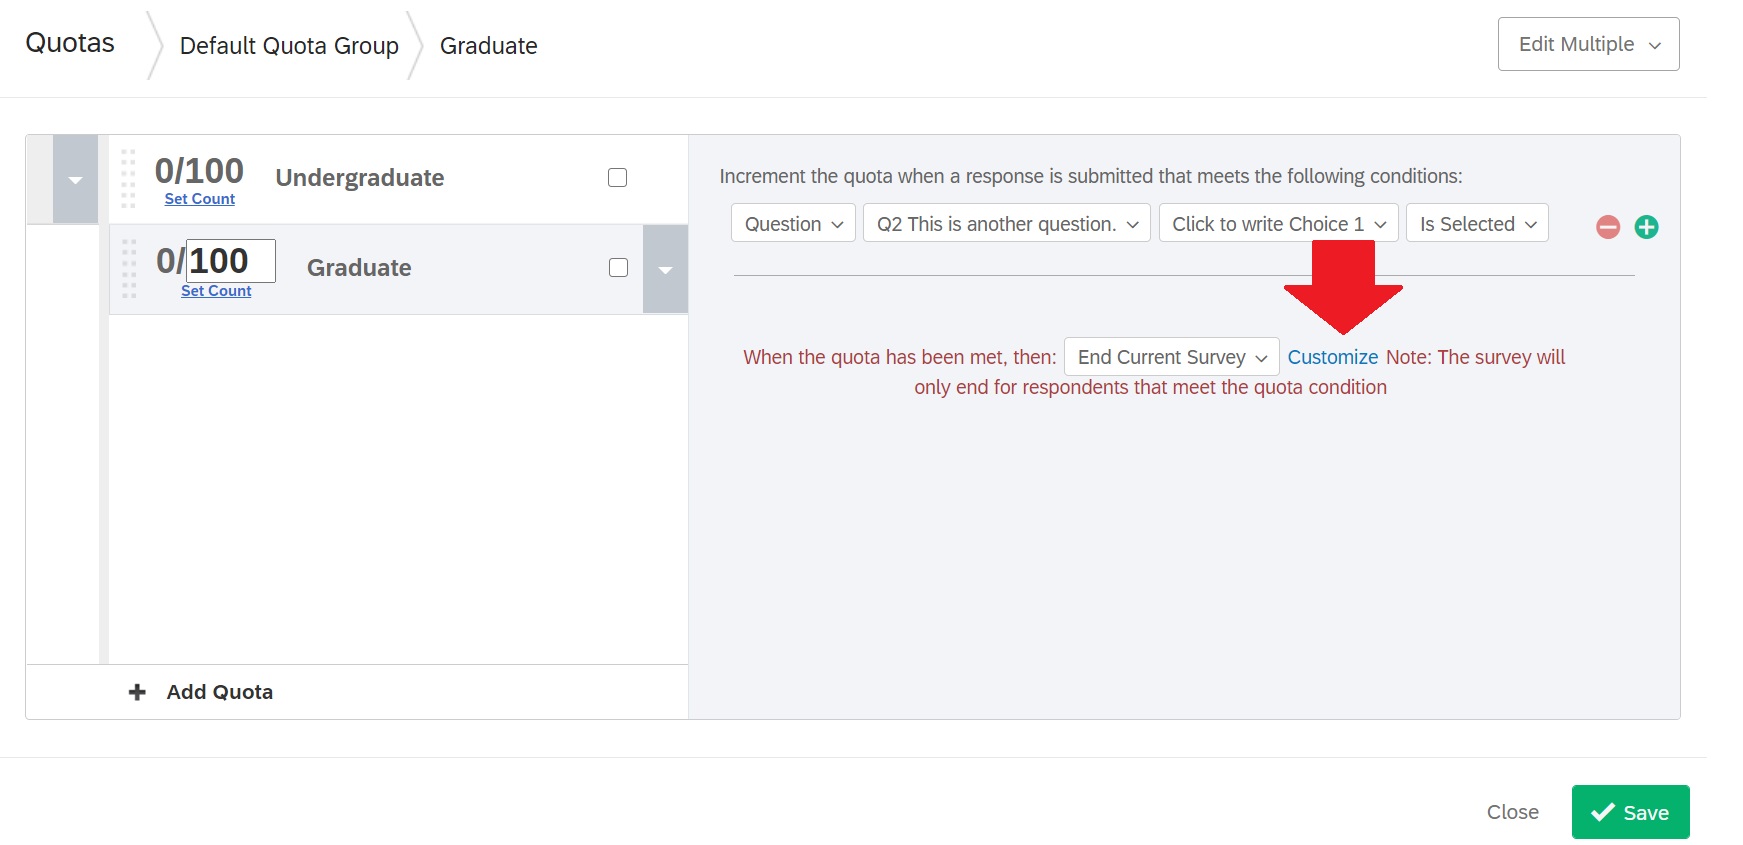
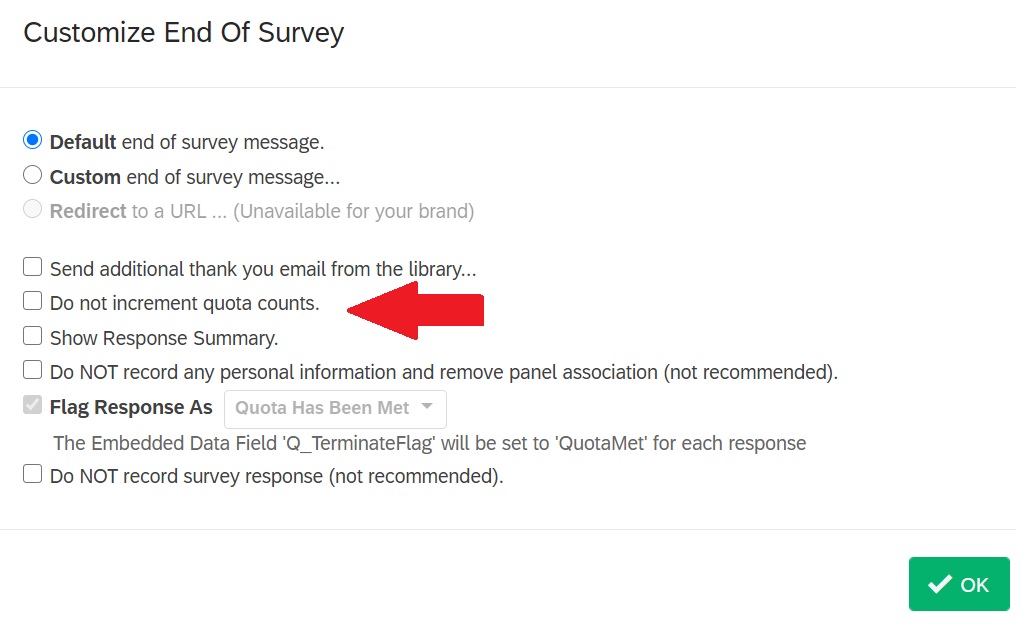
- If you choose to “End Current Survey,” you will need to click on “Customize” next to the drop-down box.
If you would like to stop the quota count once the quota reaches the limit, check the “Do not increment quota counts.” If you do not select this box, the participant will be included in the quota count, even though the survey ended after answering the disqualifying question.
- Save changes
DISTRIBUTION
There are multiple means to distribute a Qualtrics survey: email, contact list, anonymous link, social media, trackable link. Qualtrics provides a distribution summary showing the number of responses per day and utilized distribution channel.
- Open the survey you would like to publish and then go to the Distributions tab
- Here you can select the distribution channel

*If you make changes to the survey after it has been published, you will need to republish for the changes to go into effect. You can republish the survey by going into the Survey tab and selecting Publish.
Contact Lists: Contact lists can be easily created by going to the “Contact” section and selecting “+ Contact List.” You can create different groups by importing a contact list or adding members manually.
DATA & REPORTS
The “Data & Analysis” tab has numerous options to help analyze data.
- View all the participants’ responses and embedded data
- Import and export data
- Reorganize data by adding or editing columns
- Stats IQ option allows users to create, edit, and recode variables
The “Reports” tab organizes data in visually appealing charts.
This section allows users to:
- View descriptive statistics
- Customize charts and reports
- Export charts into various document formats such as PDF, Word, and PowerPoint
MOVING USER ACCOUNT AND SURVEYS
If you build a survey in another account but have not started to collect data or you have previously collected data with a survey that is now inactive and will not be reopened, you may manually move the survey.
* Emailed surveys: You will lose the distribution names, history, and the ability to send Thank-you and Reminder emails during this process.
Moving the Survey
- Log into the old account and select the survey you would like to move
- Select “Add Below” and then “Embedded Data”
- Add three new fields: RecipientEmail, RecipientFirstName, and RecipientLastName
- Click on “Move” in this block and drag it to the top of the survey flow
- After that, go to “Tools” and select “Import/Export” and “Export Survey"
- The survey will download to your computer (DO NOT EDIT THE DOCUMENT)
- In the new account, create or open a survey
- Select “Tools” and “Import Survey”
After importing a survey from a different account, make sure to go through the survey to ensure all transitions and operations are working correctly and compatible with the new account.
Moving the Data
- Log into the old account and select the survey you would like to export
- Go to “Data & Analysis” and click on “Export & Import” in order to select “Export Data”
*Free account to do not have export data option - Select the file format you would like. Formats will depend on the type of account you have currently open.
- Check the “Download all Fields” box
- Select more options to view all the options
- Select “Download” and the document will download to your computer
- Log into the new account and select the survey that was previously moved
- Go to “Data & Analysis” and “Import/Export” and “Import Data”
- Upload the data from your computer
- Next you will see a “Configure the Import” screen where you can make sure the information is pulling correctly
- Select “Import Responses” when data looks correct
For more information about the user move process, please check out the Qualtrics support page: https://www.qualtrics.com/support/survey-platform/managing-your-account/user-moves/#ManualMove
If you have built a survey and are in the process of collecting data or you would like to move a large number of inactive surveys, you will need to contact Qualtrics support. This process may take 2-3 weeks to complete.
TRAINING LINK
Qualtrics offers numerous self-paced trainings from beginners to advanced users. Live trainings are available throughout the year.
https://basecamp.qualtrics.com/
For more directions and information about the survey platform features, you can view the Qualtrics support page: https://www.qualtrics.com/support/survey-platform/survey-module/survey-module-overview/
SUPPORT
Qualtrics offers chat, e-mail, and phone support.
https://www.qualtrics.com/support-center/?Q_Language=EN
You may also contact us with questions using the inquiry and appointment forms.